Our new Eyemagnet app integration makes it easier than ever to connect your Canva and Eyemagnet accounts, streamlining your creative workflow from design to digital signage.
This guide walks you through linking your accounts, importing assets from the Eyemagnet CMS into Canva, and exporting finished designs back to Eyemagnet for seamless content deployment.
To connect your accounts:
Open your design in Canva.
Click or hover over the Apps icon in the sidebar.
Search for “Eyemagnet” in the Apps panel.
Click the Eyemagnet app in the results.
Select Open at the bottom of the page.
Click Connect to link your Eyemagnet account.
When prompted, enter your Eyemagnet credentials and click Log In.
Your Canva and Eyemagnet accounts are now connected.
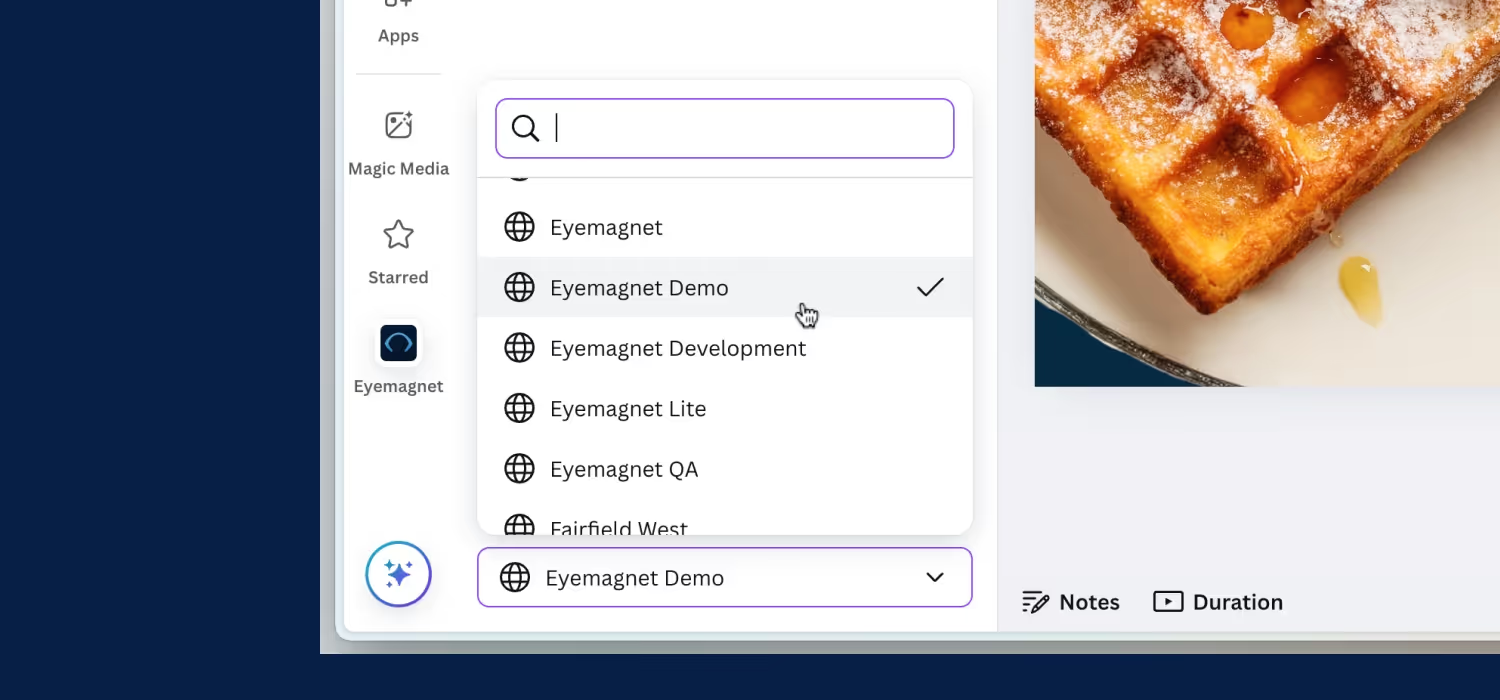
Once your accounts are linked, you can easily import assets such as logos or images:
In the Eyemagnet app panel, select your team from the dropdown at the bottom.
The app will default to the Import tab.
Scroll through image assets from the CMS or search for the item you would like to import.
Click the desired asset, then select Import Media.
The image will appear in your Canva design and in the Canva Uploads tab. To import additional assets, simply repeat the process.
Note: Images may appear low-resolution during import but will display in full quality once complete.
The Eyemagnet app offers three streamlined export options—Upload, Insert, and Replace—making it easy to move your Canva designs into your digital signage network.
Upload: Send your design directly to your Eyemagnet CMS media library for future use across your signage network.
Insert: Place your design or video directly into a playlist, specifying its exact position in the sequence.
Replace: Swap out an existing playlist entry with your new content, ensuring your displays stay current.
Click on the Export tab at the top of the Eyemagnet app.
Click Export Design.
Choose your preferred file type.
Click Export.
Your design will render, upload, and appear in your team’s CMS Media Library within a few minutes.
Note: If you don’t see your export immediately, refresh the Eyemagnet CMS page.
Click the Insert tab under Export.
Open the playlist dropdown and find your playlist (search or scroll).
Select your playlist.
Choose the position in the playlist for your content.
Click Export & Insert.
Choose your preferred file type.
Click Export.
Your content will be uploaded to the CMS Media Library and inserted into your chosen playlist within minutes. Once added, you can adjust the duration, set embargo/expiry dates, and add tags or locations.
Note: Each export from Canva creates a new media item in the Eyemagnet CMS.
Click the Replace tab under Export.
Open the playlist dropdown and find your playlist (search or scroll).
Select your playlist.
Open the Entry dropdown and choose the playlist entry you want to replace.
Click Export & Replace.
Choose your preferred file type.
Click Export.
Your new content will upload, appear in the CMS Media Library, and replace the selected playlist item within a few minutes.
By using these export options, you can efficiently manage and update your digital signage content directly from Canva, keeping your displays fresh and relevant.
If you have access to multiple teams:
Click the Team dropdown at the bottom of the Eyemagnet app in Canva.
Select the team you wish to work with.
All subsequent imports and exports will apply to the selected team.
Note: This feature is only available if your account is linked to more than one team.
To disconnect your Eyemagnet account from Canva:
Open the Eyemagnet app from the Canva sidebar.
Click the ••• icon in the top right corner.
Click Remove from your apps
Your account will be disconnected and you can reconnect at any time by following the linking instructions above.
By integrating Canva and Eyemagnet, you can manage your creative assets and digital signage content in one streamlined workflow — saving time and reducing manual steps.